Egress Trunks
Egress Trunks is used to transfer the call from inside of system and proceeds through its routers to a destination somewhere outside of the system. Egress Trunk is added to Routing Plan to route the call.
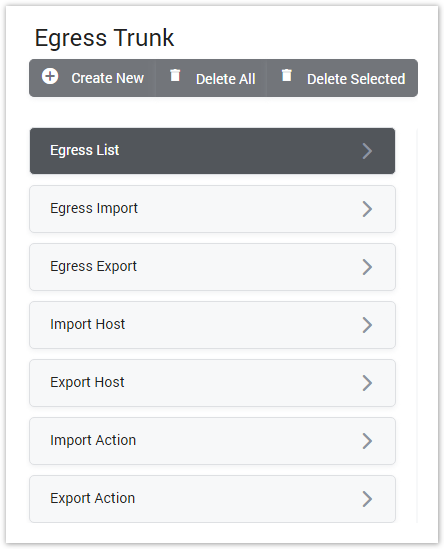
This section help user to manage all egress trunks. There are some options as below:
Screenshot: Egress Trunks Menu
Egress Trunks List
By click on Route → Trunks → Main window of this section will be appeared by the list of all available Egress Trunks.
Screenshot: Egress Trunk List
On this page:
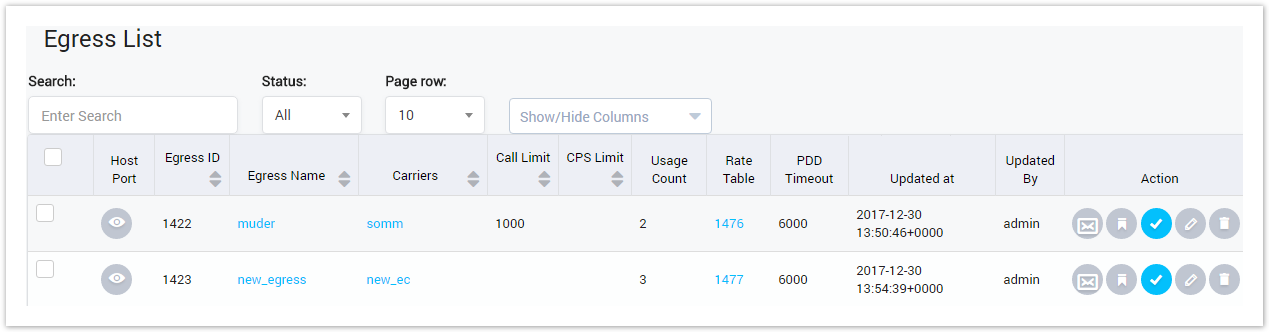
| Column Name | Description |
|---|---|
| Egress ID | ID of Egress Trunk. |
| Egress Name | Name of Egress Trunk |
| Carriers | The Carriers owner this Egress Trunk. |
| Call Limit | Limit of calls on Egress Trunk. |
| CPS Limit | Limit of Call Per Second on Egress Trunk |
| Usage Count | Total Dynamic Routings/Products are using this Egress Trunk. |
| Rate Table | Rate Table of Egress Trunk |
| PDD Timeout | Post Dial Delay timeout. |
| Update At | The last date/time when Egress Trunk was updated. |
| Update By | The last person who updating Egress Trunk. |
| Action | The Action performed on Egress Trunk. |
| Button | Description |
|---|---|
| Is used to view Host Port of the trunk. Click on this icon, there is a pop-up as below:
|
| Is used to send email to NOC email when the trunk is interrupted. |
| Is used to save Egress Trunk with all information as a template. |
| Is used to activate/deactivate Egress Trunk. |
| Is used to edit Egress Trunk. |
| Is used to delete Egress Trunk. |
| Is used to query data by the name of Egress Trunk. |
| Is used to query data by the status of Egress Trunk. |
| Is used to set the total of records per a page. |
| Is used to select the column which will be shown/hidden. |
| Is used to go to next, previous page. It is also used to go to the specific page by clicking on the number of page. |
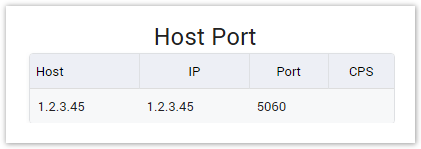


Only one Host Port details can be viewed at a time. When you expand another Host Port, the previously expanded one will collapse.
Egress Import
This tab allows the user to import Egress List instead of creating manually.
Click on Egress Import tab, the main window will appear as below:
Screenshot: Egress Import
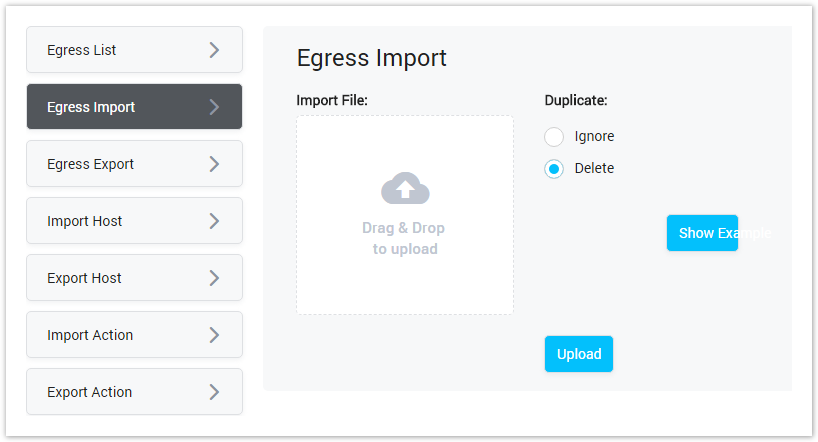
| Field Name | Description |
|---|---|
| Import File | Select file to import. after uploading, Show and Modify button will appear allow the user to show and modify all records before importing |
| Method | Action performed on duplicate records. Ignore or Delete |
| Example | Download example file. |
Fill out all parameters and click the Upload button to import.
Egress Export
Click on Egress Export tab, the new window will appear allow the user to download block list.
Screenshot: Egress Export
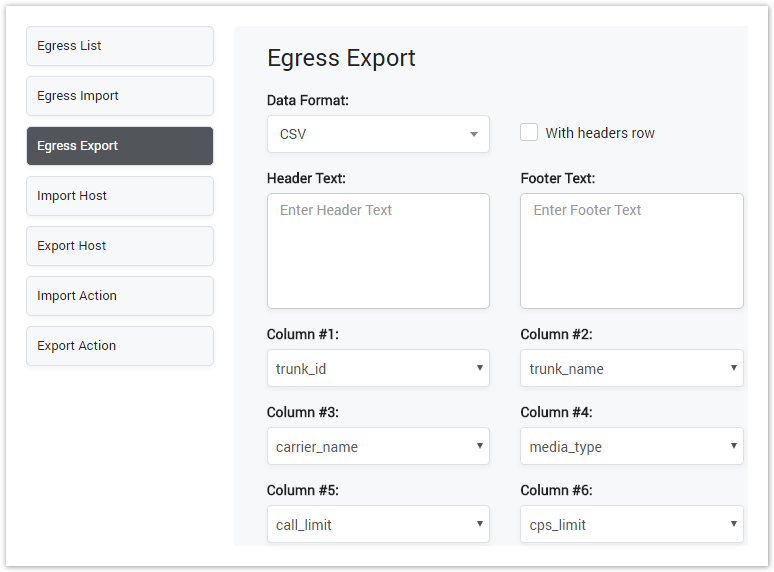
Selecting the format of the export file. There are two types: CSV and XLS.
Checking on "with headers row" checkbox, the export file will have the header and footer row with text which is configured in Header Text and Footer Text textbox.
Select columns you want to export and click the Download button. Click on Reset button to Reset and Back button to go back to Client List page.
Select format, header text, columns want to export and click the Download button. The exported file will be downloaded as expected.
You can also import, export Host and Action for Egress Trunk. For further informationofHost and Action, we will get in the Egress Trunk details part.
Deleting All
Click on Delete All button to delete all billing rule in the system.
Deleting Selected
Using the Select icon to select rule then click on Delete Selected button to delete all selected billing rule.
Delete function can be used to permanently remove a Billing Rule from the system. Please, use this feature with care – deleted Billing Rule cannot be restored by any means.
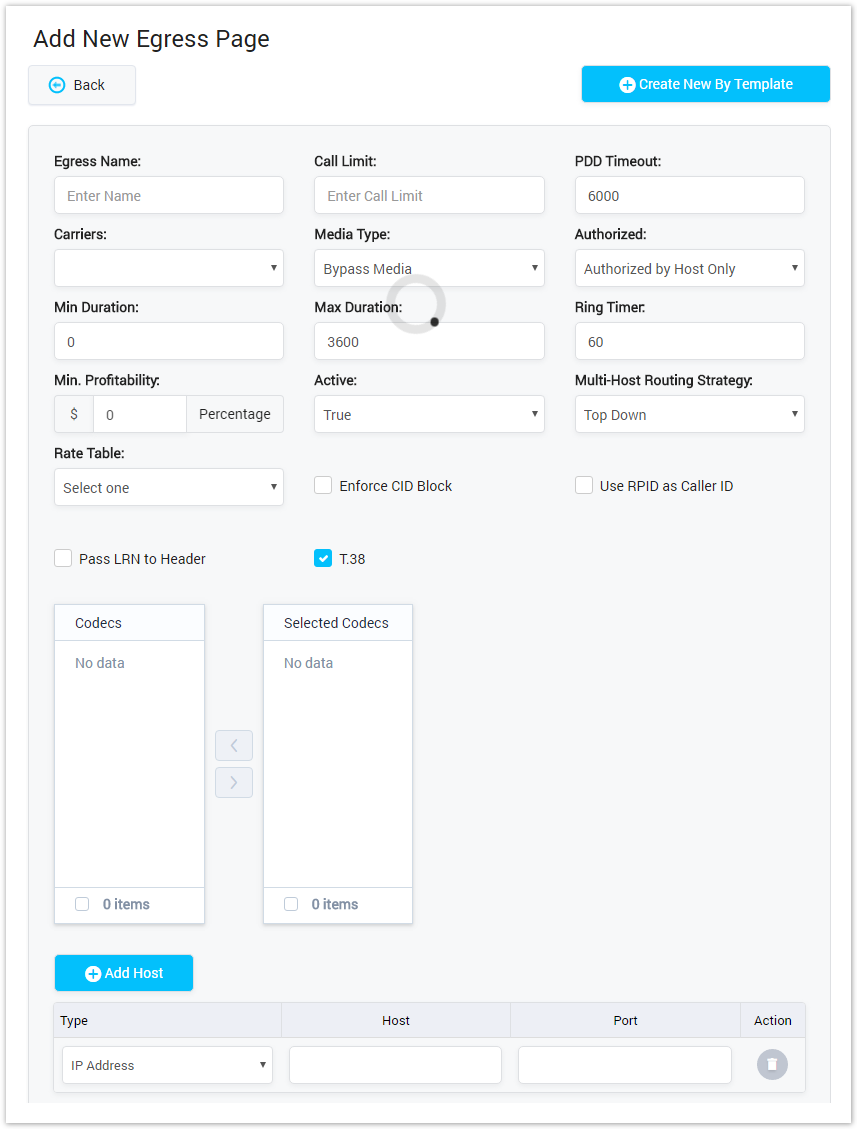
Adding New Egress Trunk
Click on Create New button, the new window will appear allow the user to input all parameters and create new Egress Trunk.
Screenshot: Creating New Egress Trunk
| Field Name | Description | ||||||||||||
|---|---|---|---|---|---|---|---|---|---|---|---|---|---|
| Egress Name | Name of Egress Trunk. | ||||||||||||
| Carriers | Assign Egress Trunk for Carrier. | ||||||||||||
| Media Type | There are two types of Media:
| ||||||||||||
| Min.Profitability | Set the minimum of Profitability of Egress Trunk. It counts by percentage or fixes value. | ||||||||||||
| Call Limit | Limit of Call through Egress Trunk. | ||||||||||||
| CPS Limit | Limit of Call Per Second through Egress Trunk. | ||||||||||||
| Active | Status of Egress Trunk: Activate or Deactivate. | ||||||||||||
| Enable T38 | Enable the T38 protocol for this trunk. | ||||||||||||
| PDD Timeout | Post Dial Delay timeout. | ||||||||||||
| Multi-Host Routing Strategy | Routing Strategy when there are many Hosts belong to Egress Trunk.
| ||||||||||||
| Pass LRN to header | Pass Location Routing Number to header. | ||||||||||||
| Min Duration | Minimum of Call Duration Time. | ||||||||||||
| Max Duration | Maximum of Call Duration Time. | ||||||||||||
| Rate Table | Rate Table for Egress Trunk | ||||||||||||
| Ring Time | The Ring Time for a call through Egress Trunk. | ||||||||||||
| Use RPID as Caller ID | Use RPID as Caller ID. | ||||||||||||
| Enforce CID Block | Enforce CID Block for this trunk. Please refer CID Block for more details. | ||||||||||||
| Codecs | Select Codes for encoding or decoding a digital data or call signal. | ||||||||||||
| Authorized | There are 3 types of Authorized:
| ||||||||||||
| Add Host | This form is displayed if Authorized by Host-Only.
| ||||||||||||
| Add SIP User | This form is displayed if Authorized by SIP Registration.
| ||||||||||||
| Add Gateway Info | This form is displayed if Authorized is Register to the gateway.
|
Filling out all parameters and click on Submit button to save. If not, click on Reset button to clear all fields.
The user can also create new Egress Trunk by Template. There is some default information of Egress Trunk in Template. The user just inputs a little bit information such as name. Please refer Egress Trunk Template for further info.
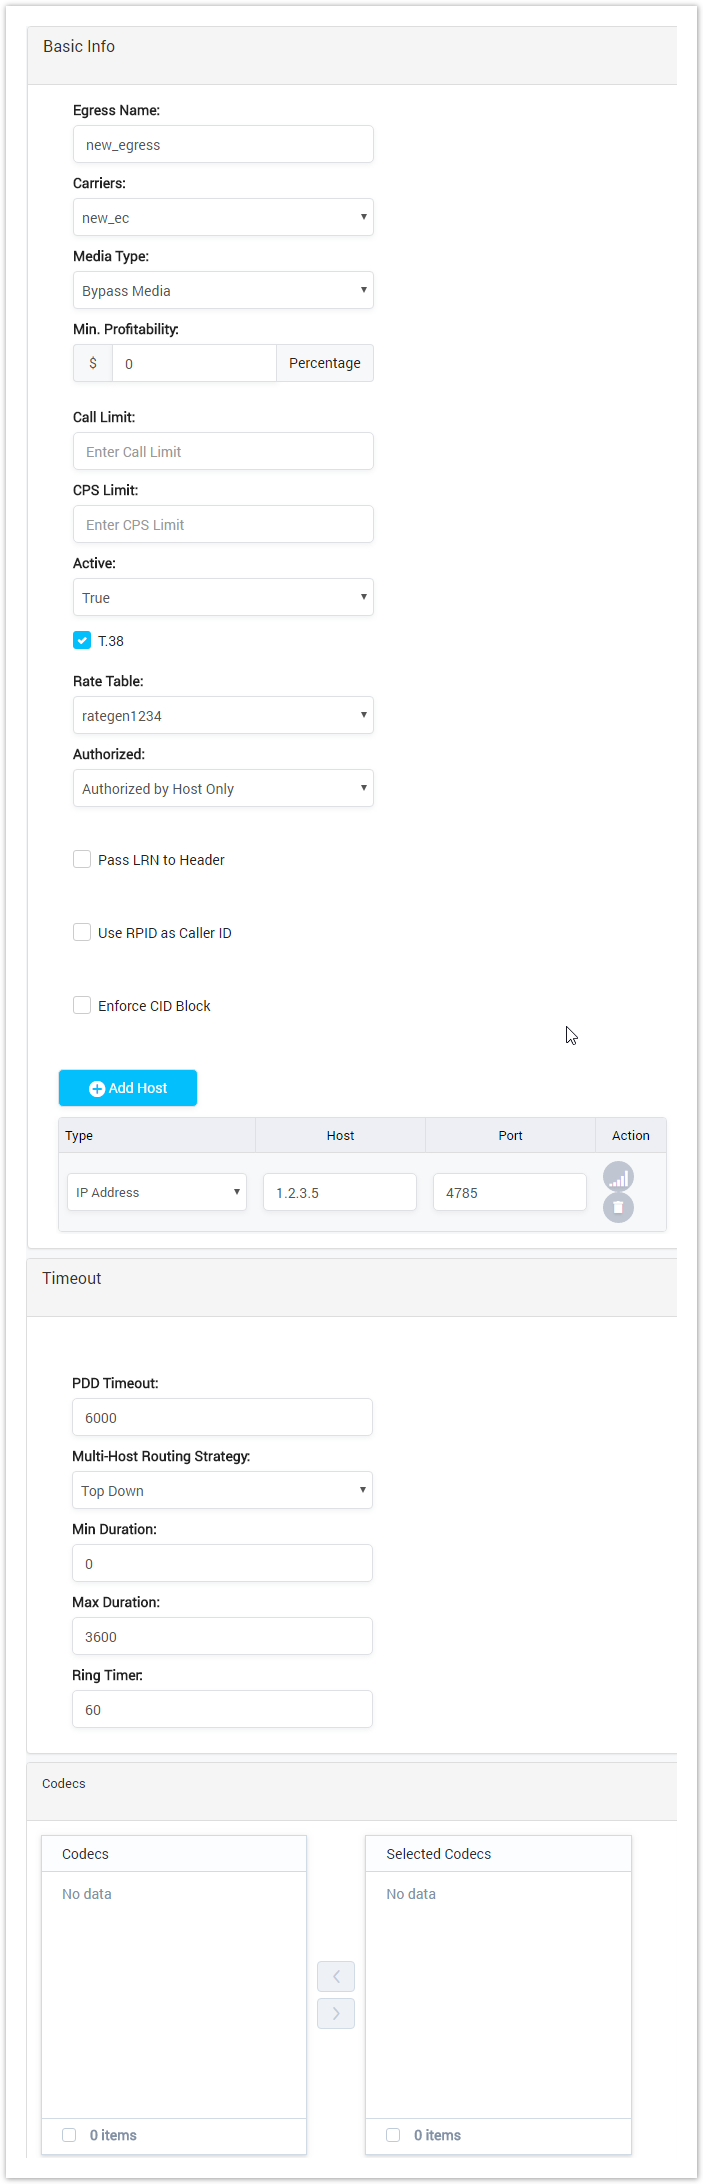
Egress Trunk Details
To view details of Egress Trunk, click on Trunk Name, the window will be appeared as below:
Basic Information
Screenshot: Egress Trunk Details
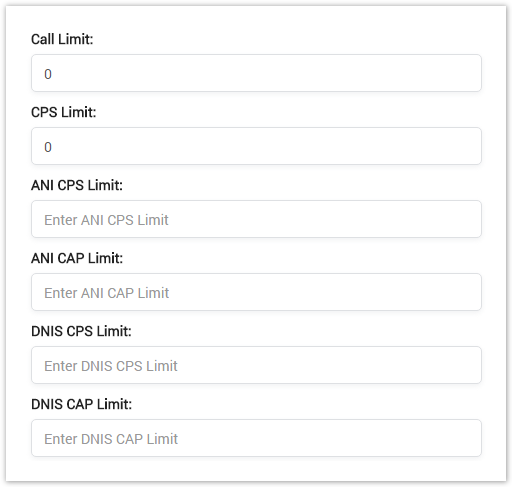
Limits
This tab is used to set the limits value for the Egress Trunk.
Screenshot: Limits
 Enable PCI
| Field Name | Description |
|---|---|
| Call Limit | Set the call limit on this trunk. |
| CPS Limit | Set the Call Per Second limit on this trunk. |
| ANI CPS Limit | Set the Call Per Second limit of caller number on this trunk. |
| ANI CAP Limit | Set the Capacity Limit of caller number on this trunk. |
| DNIS CPS Limit | Set the total Call Per Second of callee number on this trunk. |
| DNIS CAP Limit | Set the Capacity Limit of callee number on this trunk. |
Action
This tab is used to set the action will perform if there is a call go through this Egress Trunk.
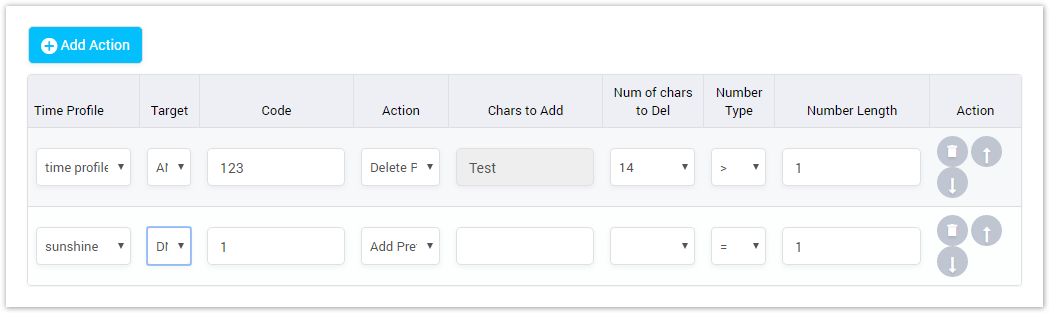
Screenshot: Action
| Field Name | Description |
|---|---|
| Time Profile | Select the time profile when the action is effective. |
| Target | The target of action. Actions will be performed on this object. it includes: ANI/DNIS. |
| Code | Set the code. |
| Action | The action includes: Add Prefix, Delete Prefix, Add Suffix and Delete Suffix. |
| Chars to Add | Set the characters will be add to ANI/DNIS. |
| Num of chars to Del | Set the total of characters will be remove from ANI/DNIS. |
| Number Type | Set the condition to triggered action. |
| Number Length | Set the number length. It will combine with Number Type. If the Number meet the condition, the action will be triggered. |
| Is used to delete the action. |
| Is used to change the oder of action by moving up. The top action will be given the priority. |
| Is used to change the oder of action by moving down. The top action will be given the priority. |
Fail-over Rule
Failover is switching to a redundant or trunk, host upon the failure or abnormal termination of the previous call. This section is used to define the Rule to do the Failover
Screenshot: Fail-over Rule
For more information, please refer Fail-over Rule page.
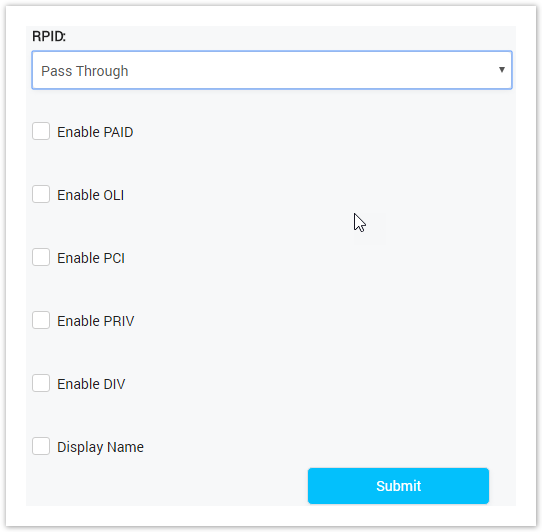
PASS
This tab is used to set the condition to pass the call
Screenshot: Pass
| Field Name | Description |
|---|---|
| RPID | Never: Do not pass Remote part ID to the egress side Pass Through: Always pass Remote part ID to the egress side if it exists in the ingress SIP INVITE header Updating the Caller Number: Map the Caller Number to Remote part ID and pass to egress side |
| Enable PAID | Never: Do not pass P-Asserted ID to the egress side Pass Through: P-Asserted ID to the egress side if it exists in the ingress SIP INVITE header Updating the Caller Number: Map the Caller Number to P-Asserted ID and pass to egress side |
| Enable OLI | Never: Do not pass Origination Line Info to the egress side Pass Through: Always pass Origination Line Info to the egress side if it exists in the ingress SIP INVITE header |
| Enable PCI | A field in SS7 signaling. |
| Enable PRIV | Never: Do not pass Privacy Header to the egress side Pass Through: Always pass Privacy Header to the egress side if it exists in the ingress SIP INVITE header |
| Enable DIV | Never: Do not pass SIP Division Header to the egress side Pass Through: Always pass SIP Division Header to the egress side if it exists in the ingress SIP INVITE header |
| Display Name | A field in SS7 signaling. |
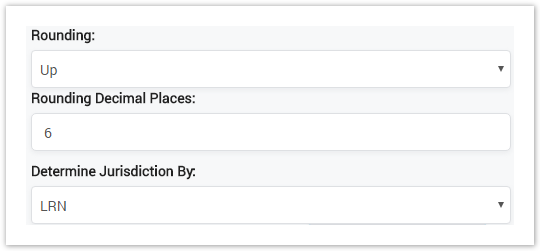
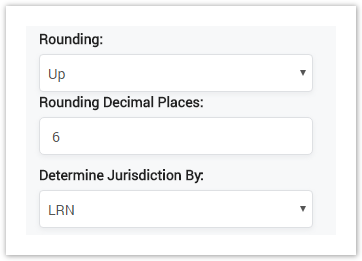
Billing
This tab is used to set the way to count the amount in billing.
Screenshot: Billing
| Field Name | Description |
|---|---|
| Rounding | The way to rounding the Decimals. Up: For example 5.5 will be rounded up to 6 Down: For example 5.5 will be rounded down to 5 |
| Rounding Decimal Places | The position of a digit to the right of a decimal point which will be rounded. |
| Determine Jurisdiction By | There are two options: LRN: Determine by Location Routing Number DNIS: Determine by the number of callee. |
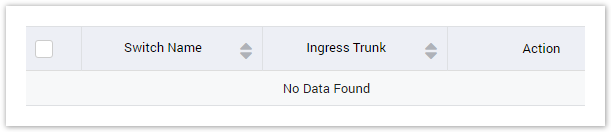
SIP Profile
This tab is used to define SIP profile on this Egress Trunk
Screenshot: SIP Profile
| Field Name | Description |
|---|---|
| Switch Name | The name of the V5 switch. |
| Ingress Trunk | The name of the Ingress Trunk. |
| Binding IP | The Binding IP. |
| Action | The action performed on record. |
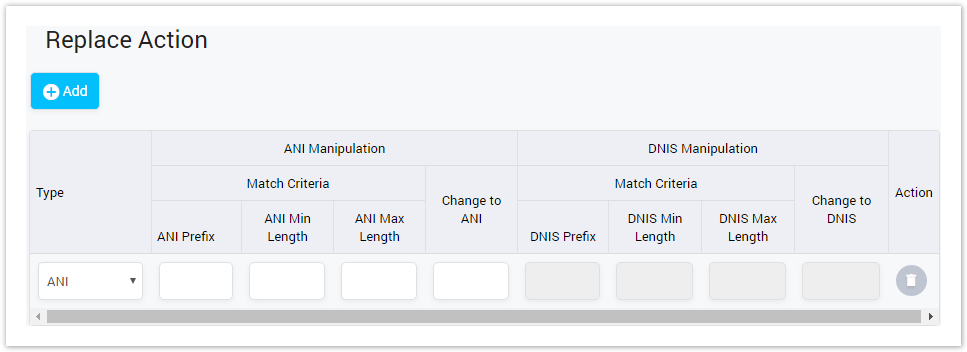
Replace Action
This tab is used to define the action the replace the ANI/DNIS number by the others one when it meet criteria.
Screenshot: Replace Action
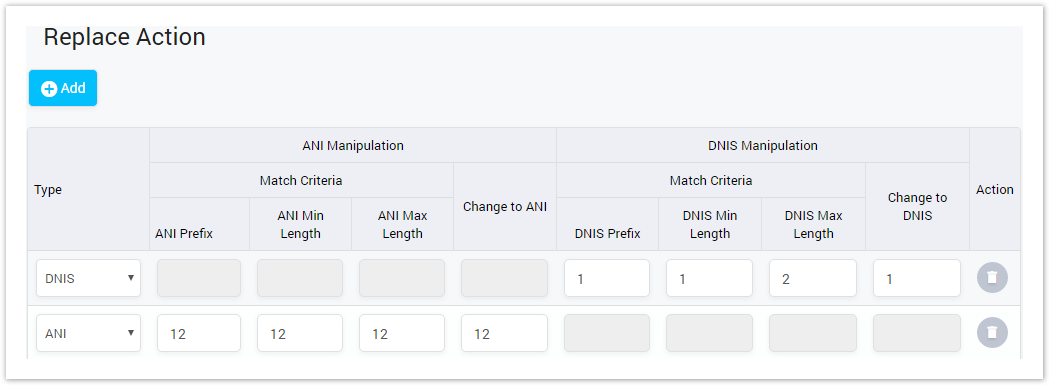
| Field Name | Description |
|---|---|
| Type | Type of object that the action will be applied to. It includes: ANI, DNIS and Both. |
| Prefix | Set the prefix criteria. If the ANI has prefix match with this value, the action will be performed. |
| Min | Set the min of ANI length. If the length of ANI in this range (between min and max), the action will be performed. |
| Max | Set the max of ANI length. If the length of ANI in this range (between min and max), the action will be performed. |
| Change To | Define the action by providing the number. If match criteria, this number will replaced old ANI number. |
| Prefix | Set the prefix criteria. If the DNIS has prefix match with this value, the action will be performed. |
| Min | Set the min of DNIS length. If the length of DNIS in this range (between min and max), the action will be performed. |
| Max | Set the max of DNIS length. If the length of DNIS in this range (between min and max), the action will be performed. |
| Change To | Define the action by providing the number. If match criteria, this number will replaced old DNIS number. |
| Action | Action performed on the record. |
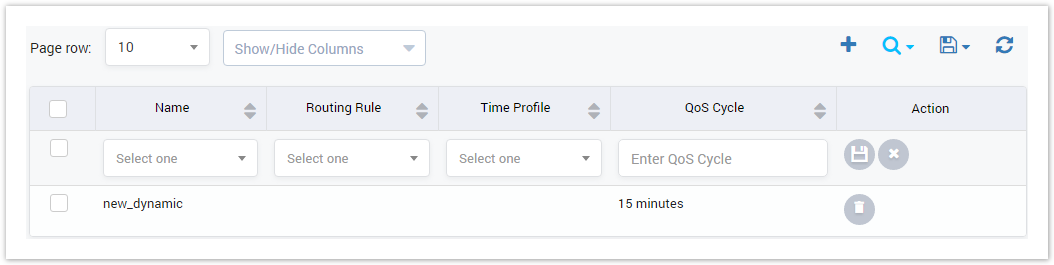
Dynamic Routing
This tab is used to config the dynamic routing for this Egress Trunk.
All the calls go through this trunk have to follow this routing.
Screenshot: Dynamic Routing
Please refer the Dynamic Routing page for more details.
You can add Dynamic Routing for Egress Trunk by clicking on the Create New button. On the list of routing, check on the routing you want to select and click on Add button to save.
Click on Delete All to delete all the Dynamic Routing from this trunk or Delete Selected to remove the routing you selected.
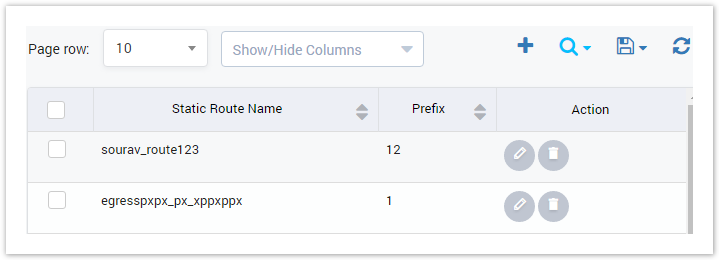
Static Routing
This tab is used to config the static routing for this Egress Trunk.
All the calls go through this trunk have to follow this routing.
Screenshot: Static Routing
Please refer the Static Routing page for more details.
You can add Static Routing for Egress Trunk by clicking on the Create New button. On the list routing, select one from dropdown list the click Add button to save.
Click on Delete All to delete all the Dynamic Routing from this trunk or Delete Selected to remove the routing you selected.
Ingress Capacity
This tab is used to set capacity for the Ingress Trunk.
Screenshot: Ingress Capacity
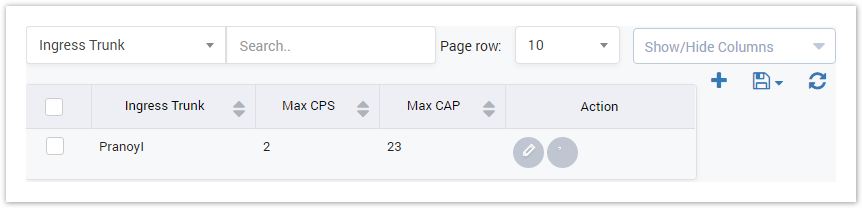
| Field Name | Description |
|---|---|
| Ingress Trunk | Select name of the Ingress Trunk |
| Max CPS | Set the maximum of Call Per Second on Ingress Trunk. |
| Max CAP | Set the maximum of CAP on Ingress Trunk. |
| Action | Action performed on records. |
You can add Ingress Capacity by clicking on the Create New button.
Click on Delete All to delete all the Ingress Capacity or Delete Selected to remove the routing you selected.
Ingress Trunk
Ingress Trunks is used to transfer the call from outside of system into inside. Ingress Trunk is added to Routing Plan to route the call.
This section help user to manage all Ingress trunks.
Ingress Trunks List
By click on Route → Trunks → Ingress Trunk tab → Main window of this section will be appeared by list of all available Ingress Trunks.
Screenshot: Ingress Trunks List

| Column Name | Description |
|---|---|
| Ingress ID | ID of Ingress Trunk. |
| Ingress Name | The name of Ingress Trunk |
| Carriers | Carriers owner this Ingress Trunk. |
| Call Limit | Limit of calls on Ingress Trunk. |
| CPS Limit | Limit of Call Per Second on Ingress Trunk |
| Margin | The Margin for this Ingress Trunk. |
| PDD Timeout | Post Dial Delay timeout. |
| Update At | The last date/time when Ingress Trunk was updated. |
| Update By | The last person who updating Ingress Trunk. |
| Action | Action performed on Ingress Trunk. |
| Button | Description |
|---|---|
| Is used to view Host Port of the trunk. Click on this icon, there is a pop-up as below:
|
| Is used to send email to NOC email when the trunk is interrupted. |
| Is used to save Ingress Trunk with all information as a template. |
| Is used to activate/deactivate Ingress Trunk. |
| Is used to edit Ingress Trunk. |
| Is used to delete Ingress Trunk. |
| Is used to query data by the name of Ingress Trunk. |
| Is used to query data by the status of Ingress Trunk. |
| Is used to set the total of records per a page. |
| Is used to select the column which will be shown/hidden. |
| Is used to go to next, previous page. It is also used to go to the specific page by clicking on the number of page. |

Creating New Ingress Trunk
Click on Create New button, new window will be appeared allow user to input all parameters and create new Ingress Trunk.
Screenshot: Creating New Ingress Trunk
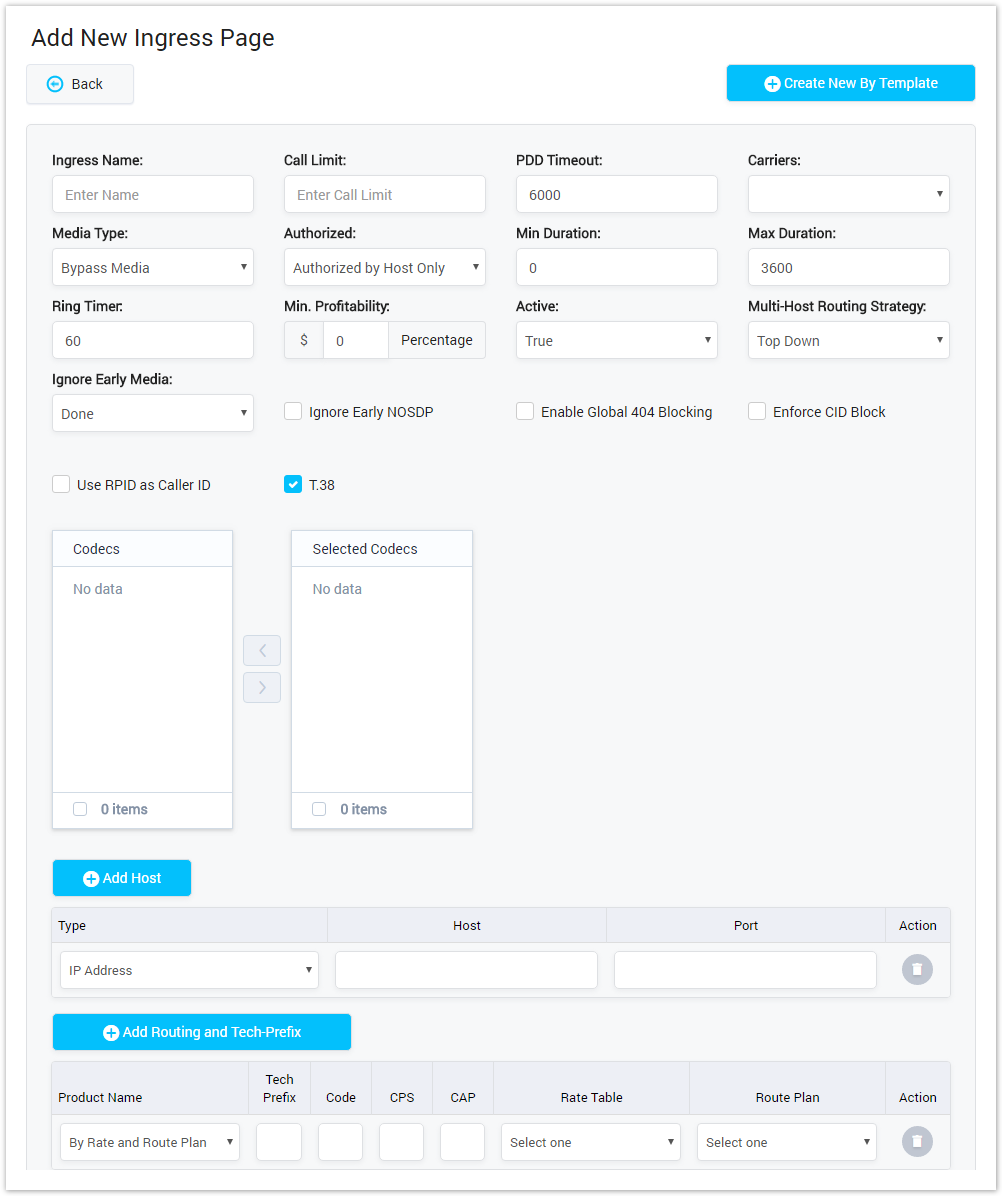
| Field Name | Description | ||||||||||||||||
|---|---|---|---|---|---|---|---|---|---|---|---|---|---|---|---|---|---|
| Egress Name | Name of Egress Trunk. | ||||||||||||||||
| Carriers | Assign Egress Trunk for Carrier. | ||||||||||||||||
| Media Type | There are two types of Media:
| ||||||||||||||||
| Min.Profitability | Set the minimum of Profitability of Egress Trunk. It count by percentage or fix value. | ||||||||||||||||
| Call Limit | Limit of Call through Egress Trunk. | ||||||||||||||||
| CPS Limit | Limit of Call Per Second through Egress Trunk. | ||||||||||||||||
| PDD Timeout | Post Dial Delay timeout. | ||||||||||||||||
| Enable T38 | Enable the T38 protocol for this trunk. | ||||||||||||||||
| Ignore Early Media | Ignore the Early Media. | ||||||||||||||||
| Active | Status of Egress Trunk: Activate or Deactivate. | ||||||||||||||||
| Min Duration | Minimum of Call Duration Time. | ||||||||||||||||
| Ignore Early NOSDP | Ignore the Early NOSDP | ||||||||||||||||
| Ring Time | Pass Location Routing Number to header. | ||||||||||||||||
| Max Duration | Maximum of Call Duration Time. | ||||||||||||||||
| Enable Global 404 Blocking | Enbale Glocal 404 Blocking. | ||||||||||||||||
| Use RPID as Caller ID | Use RPID as Caller ID. | ||||||||||||||||
| Enforce CID Block | Enforce CID Block for this trunk. Please refer CID Block for more details. | ||||||||||||||||
| Codecs | Select Codes for encoding or decoding a digital data or call signal. | ||||||||||||||||
| Authorized | This form is displayed if Authorized by Host Only.
| ||||||||||||||||
| Add SIP User | This form is displayed if Authorized by SIP Registration.
| ||||||||||||||||
| Add Gateway Info | This form is displayed if Authorized is Register to gateway.
| ||||||||||||||||
| Add Routing and Tech-Prefix | Add Routing and Tech-Prefix for Ingress Trunk
|

Filling out all parameters and click on Submit button to save. If not, click on Reset button to clear all fields.
User can also create new Ingress Trunk by Template. There is some default informations of Ingress Trunk in Template. User just input a little bit information such as name. Please refer Ingress Trunk Template for further infomations.
Ingress Import
This section tab allow user to import many Ingress Trunks from Microsoft Excel *.CSV or *.XLS files. Click on Ingress Import tab, the window will be appeared as below:
Screenshot: Ingress Import
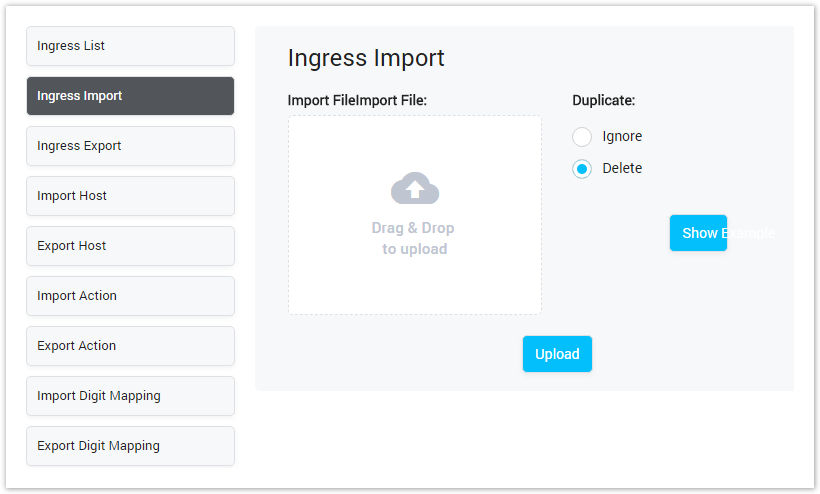
| Field Name | Description |
|---|---|
| Import File | Select file to import. after uploading, Show and Modify button will be appeared allow user to show and modify all records before importing |
| Method | Action performed on duplicate records. Ignore or Delele |
| Example | Download example file. |
Ingress Export
Click on Ingress Export tab, the new window will be appeared allow user to download Egress Trunk List.
Screenshot: Ingress Export
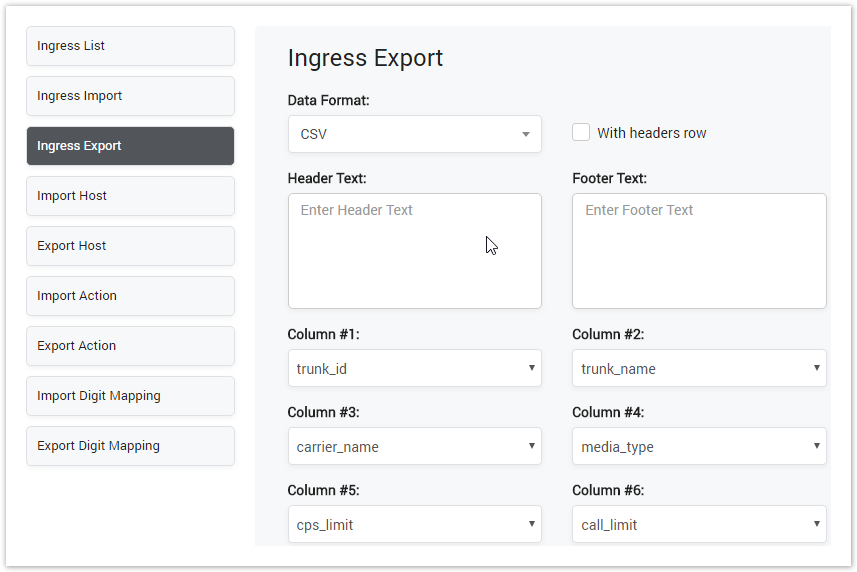
Selecting the format of the export file. There are two types: CSV and XLS.
Checking on "with headers row" checkbox, the export file will have the header and footer row with text which is configured in Header Text and Footer Text textbox.
Select columns you want to export and click Download button. Click on Reset button to Reset and Back button to go back to Client List page.
Select format, header text, columns want to export and click Download button. Exported file will be downloaded as expected.
Import/Export Host, Action and Digit Mapping are similar to Import/Export Egress.
Deleting All
Click on Delete All button to delete all billing rule in the system.
Deleting Selected
Using the Select icon to select rule then click on Delete Selected button to delete all selected billing rule.
Delete function can be used to permanently remove a Billing Rule from the system. Please, use this feature with care – deleted Billing Rule cannot be restored by any means.
Ingress Trunk Details
To view details of Ingress Trunk, click on Trunk Name, the window will be appeared as below:
Screenshot: Ingress Trunk Details
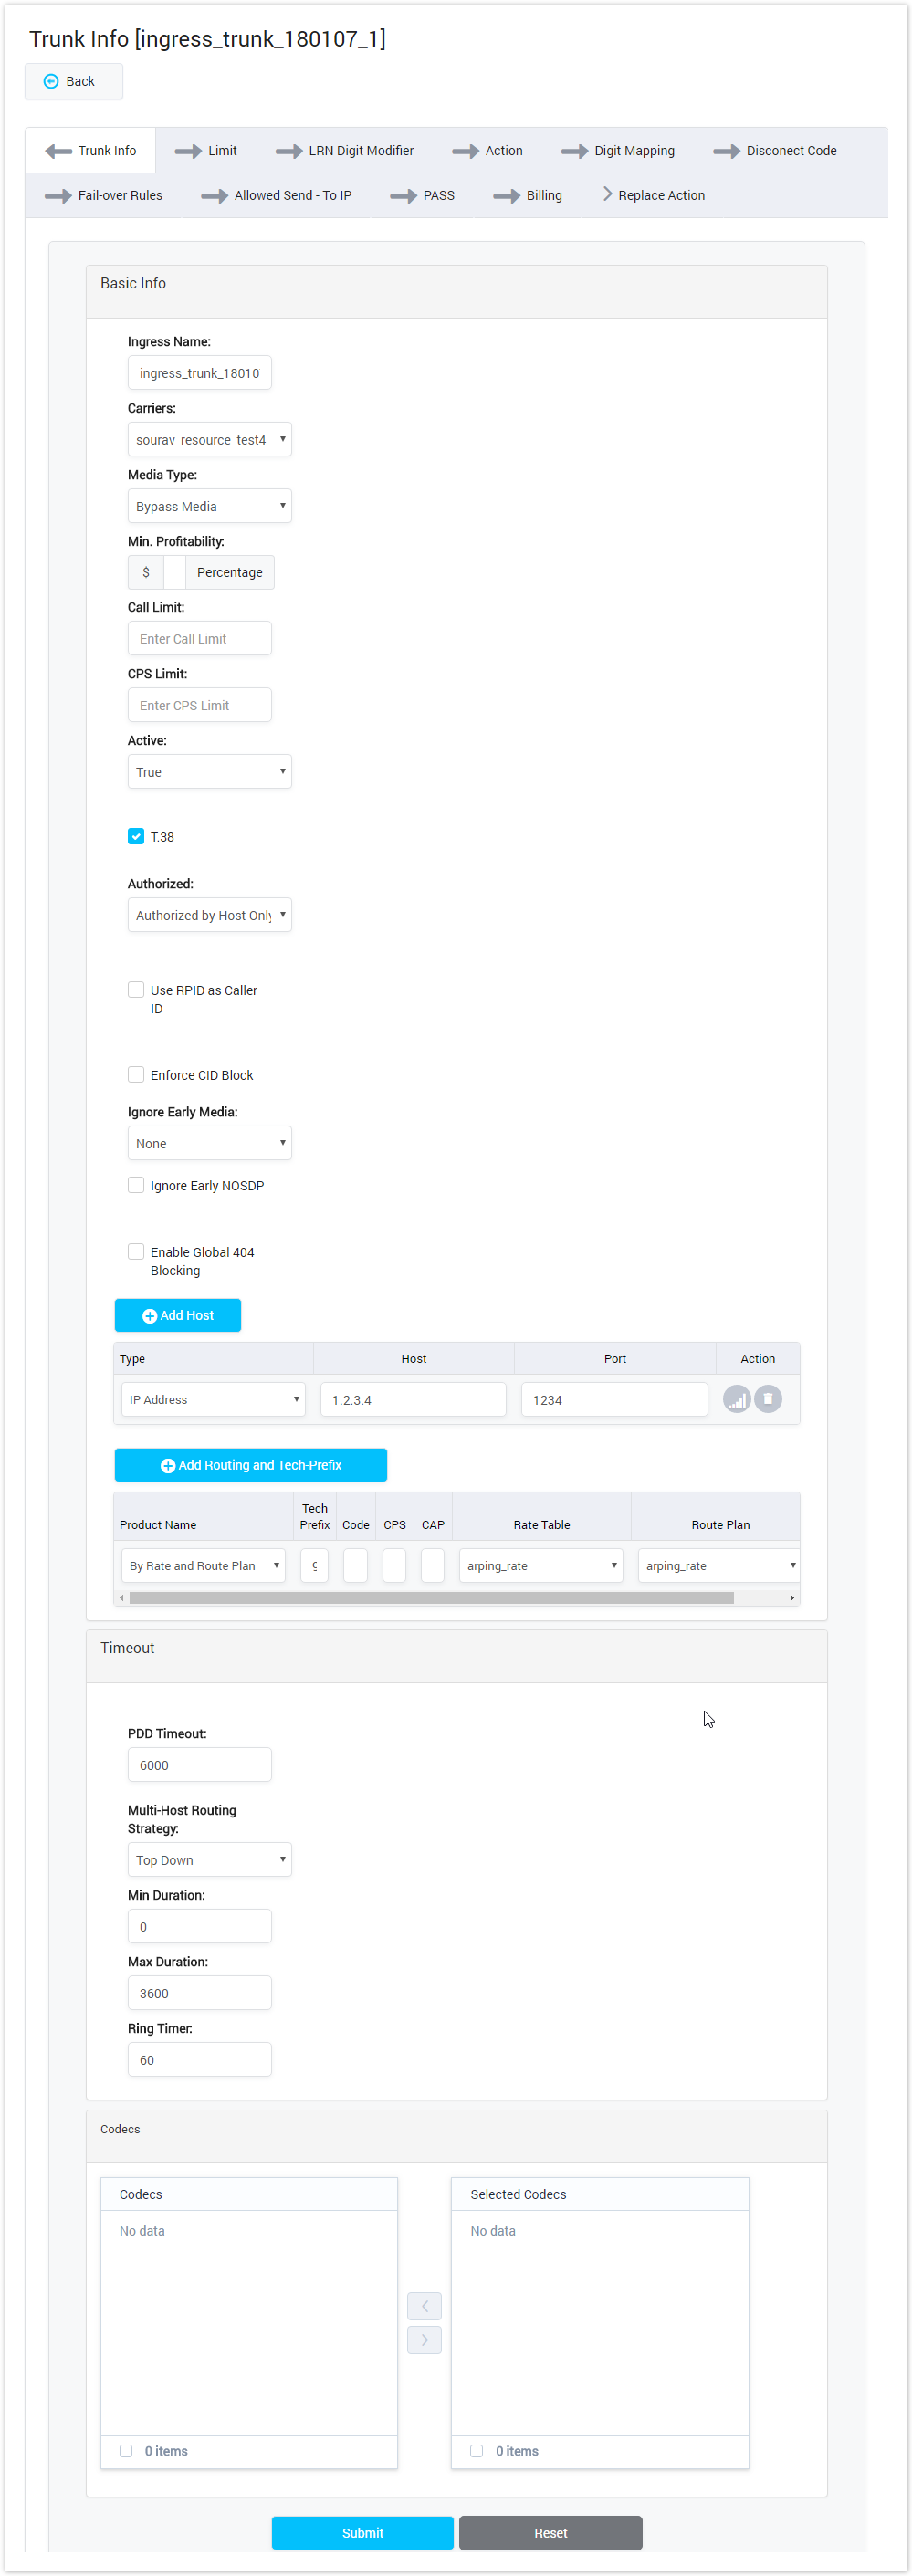
This page display information of Ingress Trunk as well as all related configuration. Clicking on fields that you want modify to edit. Then click on Submit button to save.
Limits
This tab is used to set the limit values for the Ingress Trunk.
Screenshot: Limits
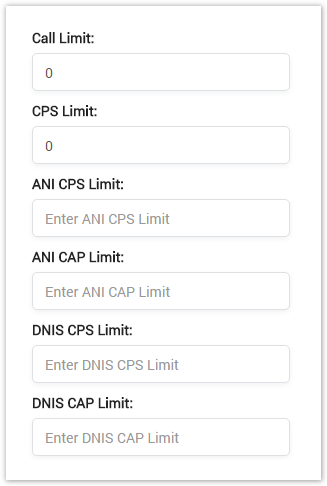
| Field Name | Description |
|---|---|
| Call Limit | Set the call limit on this trunk. |
| CPS Limit | Set the Call Per Second limit on this trunk. |
| ANI CPS Limit | Set the Call Per Second limit of caller number on this trunk. |
| ANI CAP Limit | Set the CAP Limit of caller number on this trunk. |
| DNIS CPS Limit | Set the total Call Per Second of callee number on this trunk. |
| DNIS CAP Limit | Set the CAP Limit of callee number on this trunk. |
LRN Digit Modifier
This tab is used to set the rule to modify the DNIS number.
Screenshot: LRN Digit Modifier
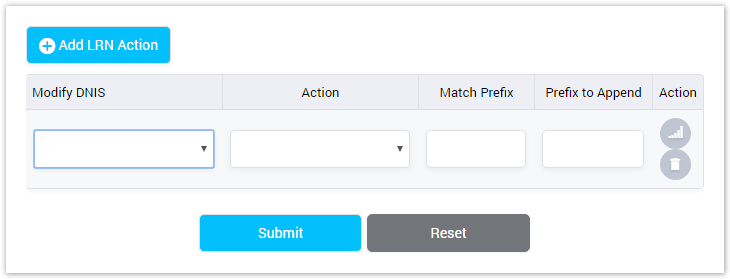
| Field Name | Description |
|---|---|
| Modify DNIS | Before Send to LRN Server: Modify the DNIS number before sending to LRN Server. After receive from LRN Server: Modify the DNIS number after receiving from LRN Server. |
| Action | Set the action performed on the DNIS number: Add Prefix, Delete Prefix, Add Suffix and Delete Suffix. |
| Match Prefix | Set the criteria for DNIS. If the DNIS has the prefix match with this value, action will be performed. |
| Prefix to Append | Set the prefix will be added/removed to DNIS number. |
| Action | Action performed on record. |
Action
This tab is used to set the action will perform if there is a call go through this Ingress Trunk.
Screenshot: Action
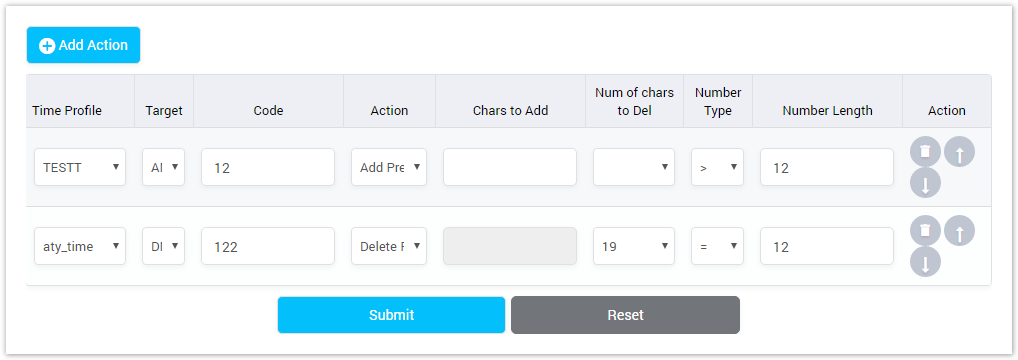
| Field Name | Description |
|---|---|
| Time Profile | Select the time profile when the action is effective. |
| Target | The target of action. Actions will be performed on this object. it includes: ANI/DNIS. |
| Code | Set the code. |
| Action | The action includes: Add Prefix, Delete Prefix, Add Suffix and Delete Suffix. |
| Chars to Add | Set the characters will be add to ANI/DNIS. |
| Num of chars to Del | Set the total of characters will be remove from ANI/DNIS. |
| Number Type | Set the condition to triggered action. |
| Number Length | Set the number length. It will combine with Number Type. If the Number meet the condition, the action will be triggered. |
| Is used to change the oder of action by moving down. The top action will be given the priority. |
| Is used to change the oder of action by moving up. The top action will be given the priority. |
| Is used to delete the action. |
Digit Mapping
This tab is used to add the Digit Mapping for the Ingress Trunk
Screenshot: Digit Mapping

Select Time Profile when the Digit Mapping take effect. Then select the Digit Mapping and click on Submit button to save.
Please refer Digit Mapping page for more details.
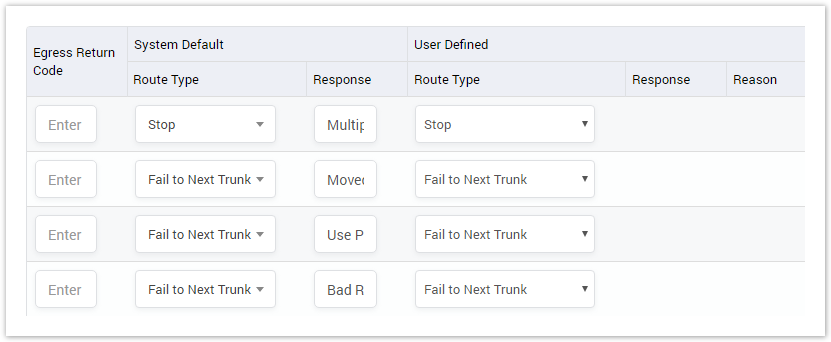
Disconect Code
This part is used to define the Code which causes of disconnect.
Screenshot: Disconect Code
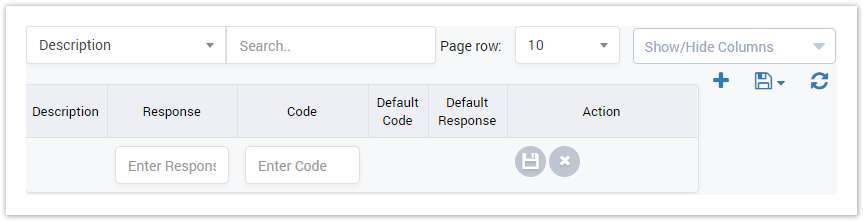
| Column Name | Description |
|---|---|
| Description | Description of disconect error. |
| Response | The disconect error response sends to the client. It is defined by user. |
| Code | The disconect error code sends to the client. It is defined by user. |
| Default Code | The Default Code. If there is no User-defined Response, this rule will be applied. |
| Default Response | The Default Response. If there is no User-defined Response, this rule will be applied. |
| Action | The action performed on the record. |
Fail-over Rule
Failover is switching to a redundant or trunk, host upon the failure or abnormal termination of the previous call. This section is used to define the Rule to do the Failover
Screenshot: Fail-over Rule

For more information, please refer Fail-over Rule page.
Allowed Send - To IP
Each switch may be listeend to multiple SIP IP. This field to let user to define the IP address(es) that is allowed for this ingress to send to. If not set, then thiis ingerss can send to all the switch's SIP IP addresses.
Screenshot: Allow Send - To IP
PASS
This tab is used to set the condition to pass the call
Screenshot: Pass
| Field Name | Description |
|---|---|
| RPID | Never: Do not pass Remote part ID to the egress side Pass Through: Always pass Remote part ID to the egress side if it exists in the ingress SIP INVITE header Updating the Caller Number: Map the Caller Number to Remote part ID and pass to egress side |
| Enable PAID | Never: Do not pass P-Asserted ID to the egress side Pass Through: P-Asserted ID to the egress side if it exists in the ingress SIP INVITE header Updating the Caller Number: Map the Caller Number to P-Asserted ID and pass to egress side |
| Enable OLI | Never: Do not pass Origination Line Info to the egress side Pass Through: Always pass Origination Line Info to the egress side if it exists in the ingress SIP INVITE header |
| Enable PCI | |
| Enable PRIV | Never: Do not pass Privacy Header to the egress side Pass Through: Always pass Privacy Header to the egress side if it exists in the ingress SIP INVITE header |
| Enable DIV | Never: Do not pass SIP Division Header to the egress side Pass Through: Always pass SIP Division Header to the egress side if it exists in the ingress SIP INVITE header |
| Display Name |
Billing
This tab is used to set the way to count the amount in billing.
Screenshot: Billing
| Field Name | Description |
|---|---|
| Use RPID as Caller ID | Use RPID display on UI as Caller ID. |
| Rounding | The way to rounding the Decimals. Up: For example 5.5 will be rounded up to 6 Down: For example 5.5 will be rounded down to 5 |
| Rounding Decimal Places | The position of a digit to the right of a decimal point which will be rounded. |
| Determine Jurisdiction By | There are two options: LRN: Determine by Location Routing Number DNIS: Determine by the number of callee. |
Replace Action
This tab is used to define the action the replace the ANI/DNIS number by the others one when it meet criteria.
Screenshot: Replace Action
| Field Name | Description |
|---|---|
| Type | Type of object that the action will be applied to. It includes: ANI, DNIS and Both. |
| Prefix | Set the prefix criteria. If the ANI has prefix match with this value, the action will be performed. |
| Min | Set the min of ANI length. If the length of ANI in this range (between min and max), the action will be performed. |
| Max | Set the max of ANI length. If the length of ANI in this range (between min and max), the action will be performed. |
| Change To | Define the action by providing the number. If match criteria, this number will replaced old ANI number. |
| Prefix | Set the prefix criteria. If the DNIS has prefix match with this value, the action will be performed. |
| Min | Set the min of DNIS length. If the length of DNIS in this range (between min and max), the action will be performed. |
| Max | Set the max of DNIS length. If the length of DNIS in this range (between min and max), the action will be performed. |
| Change To | Define the action by providing the number. If match criteria, this number will replaced old DNIS number. |
| Action | Action performed on the record. |
Related pages
Popular Topics
Recently Updated Pages