This section this used to manage all DID numbers for clients and vendors.
DID Repository
Click on Origination → DID Repository → The main window of this section is represented by the list of all available DID numbers.
DID Repository Query From
This form allows the user to query data.
Screenshot: DID Repository Query Form

On this page:
| Field Name | Description |
|---|---|
| Vendor | Query by Vendor name. |
| Client | Query by Client name. |
DID Repository Result From
Filling in criteria then click on the Query button, the result form will appear as below:
Screenshot: DID Repository Result Form
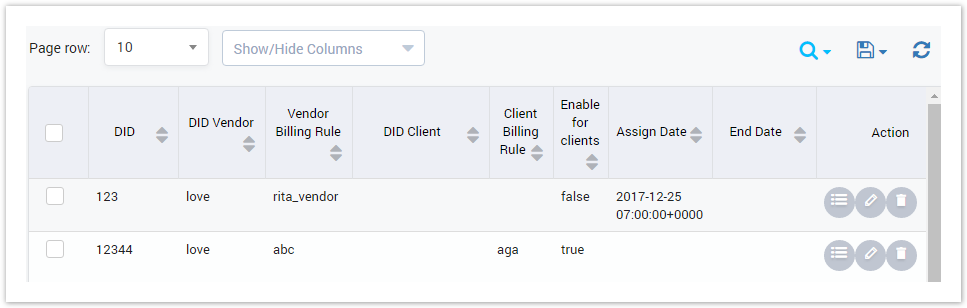
| Column Name | Description |
|---|---|
| DID | DID number. |
| DID Vendor | The vendor who will be assigned DID number to. |
| Vendor Billing Rule | Billing rule for vendor. |
| DID Client | The client who will be assigned DID number to. |
| Client Billing Rule | Billing rule for the client. |
| Enable for Clients | |
| Assigned Time | The date/time when DID number was assigned to vendor/client. |
| End Date | The date/time when DID number release to vendor/client |
| Action | Actionperformedonrecord DID number. |
| Button | Description |
|---|---|
| Is used to edit the DID's information. |
| Is used to view the action of DID number. If there isanyonecalltothisnumber, action will be triggered. Click on this, the pop-up displays:
|
| Is used to delete the DID number. |
| Is used to show/hide the query form |
| Is used to download the list of DID numbers by two types of file: CSV and XLS. |
| Is used to refresh to get latest the list of DID numbers. |
| Is used to set the total of records per a page. |
| Is used to select the column which will be shown/hidden. |
| Is used to go to next, previous page. It is also used to go to the specific page by clicking on thenumberofpage. |


Adding New DID Number
To add new DID Number, click on the Create New button.
Screenshot: Adding New DID Number

For more details of each column, please refer DID Repository section.
After filling out all fields, click on Save icon to save new DID number or click on the Back icon to cancel.
Import DID
Instead of creating manually, you can use upload function by click on Upload button. The upload window will be appeared as below:
Screenshot: Import DID

| Filed Name | Description |
|---|---|
Method | The action performed on duplicate records:
|
Import File | Choose file to upload. |
Show Example | Click on Show Example text to download example file. |
After selecting action, choosing file, click Submit button to upload.
Deleting All
Click on Delete All button to delete all billing rule in the system.
Delete function can be used to permanently remove a DID number from the system. Please, use this feature with care – deleted DID number can not be restored by any means.
Related pages
Popular Topics
Recently Updated Pages