
| Column Name | Description |
|---|---|
| Name | Name of the client. |
| Balance | Balanceofclient's account. |
| Allow Credit | Allow to pay by Credit for this client. |
| Price Per Max Chanel | The price per the Max Chanel. |
| Update At | The last date/time when client information was updated. |
| Update By | The last person who updated client information. |
| Action | Actionperformedon the record. |
| Button | Description | ||
|---|---|---|---|
| Is used to active/deactivate the Client. | ||
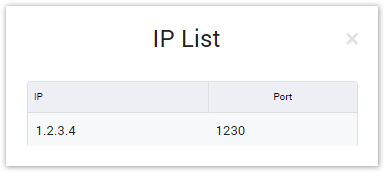
| Is used to view the list IP of the Client.
| ||
| Is used to edit the Client. | ||
| Is used to view the list DID of the Client. Click on this icon, user will be redirected to the DID Repository page. List DIDs assigned to this client will be displayed. | ||
| Is used to delete the Client. | ||
| Is used to show/hide the query form | ||
| Is used to download the list of clients by two types of file: CSV and XLS. | ||
| select the name of Client to query. Click on the arrow, the list of all available Client will be displayed. | |||
| Is used to refresh to get latest the list of clientsthe Client. | ||
| Is used to | select the field which the search function will query on.
| Is used to input the keyword to queryquery data. Clicking on this button, the result will be displayed. |
| Is used to set the total of records per a page. | ||
| Is used to select the column which will be shown/hidden. | ||
| Is used to go to next, previous page. It is also used to go to the specific page by clicking on the numberofpage. |


This section allows you to query data by the name of the Client. Input keyword into search textbox then click on the Query button, the result will be displayed.
Adding New Client
To add new Client, click on the Create New button then the main window will appear . There are three main tabs in Adding Client as below:
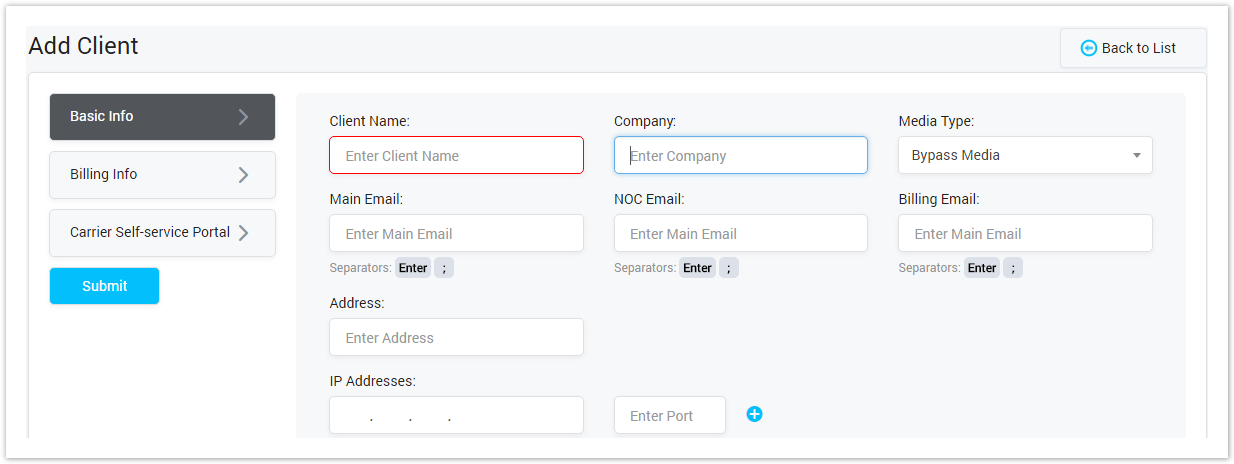
BASIC INFO
Screenshot: Adding New Client Basic Info
| Field Name |
|---|
| Client Name | Name of the Client. |
| Company | Company of the Client |
| . | |||||||
| Media Type | There are three options:
|
| |
| Main Email | Main email of Client.Emails separated by; |
| NOC Email | Network Operation Center email. It is used to receive the Trunk Update.Emails separated by; |
| Billing Email | It is used to receive the Billing and Invoice.Emails separated by; |
| Address | Address of Client |
| IP Addresses | IP Addresses and Port of the client. |
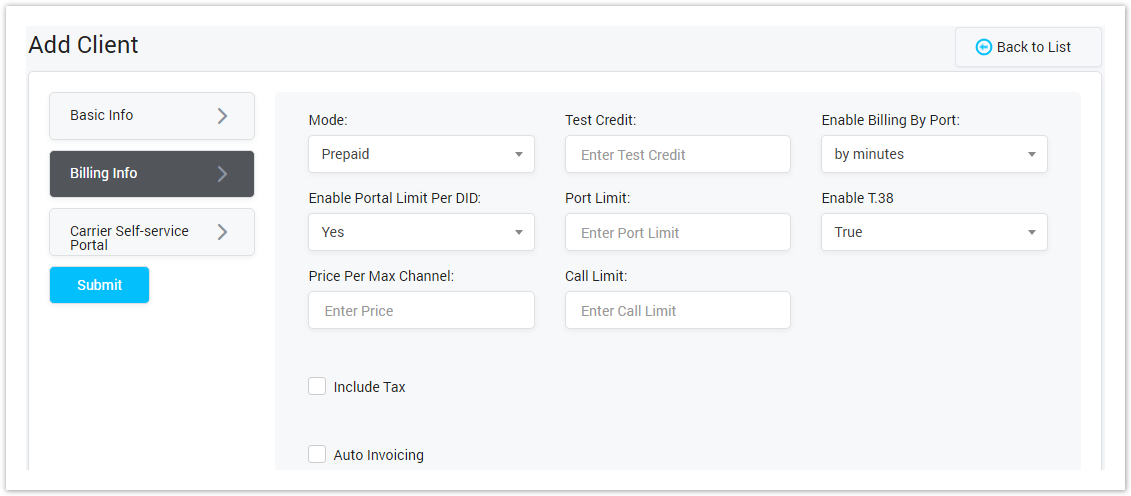
BILLING INFO
Screenshot: Billing Info
| Field Name | |
|---|---|
| Mode | Type of payment |
| ||||
| Test Credit | The credit will be purchased before services can be used |
| Enable Billing By Port | There are three options |
| ||||||
| Enable Portal Limit |
| Per DID | Choose Yes to allow Portal Limit Per DID. |
| Port Limit | Set total of Port Limit |
| Enable T.38 |
| Enable T38 protocol. |
There are three options:
| Price Per Max Channel | Set Price Per Max Channel for Client. |
| Call Limit | Set Call Limit for Client. |
| Include Tax | Include Tax in billing for Client. If checked, input the Tax value in next textbox. |
| Auto Invoicing |
Auto invoicing for client. Click on this checkbox, the new window will be displayed

| Check to allow auto invoicing to Client. Select Payment Term. If checked on Send Auto Invoice checkbox, the invoice will be sent automatically. |
CARRIER SELF_SERVICE PORTAL
Screenshot: Carrier Self Service Portal
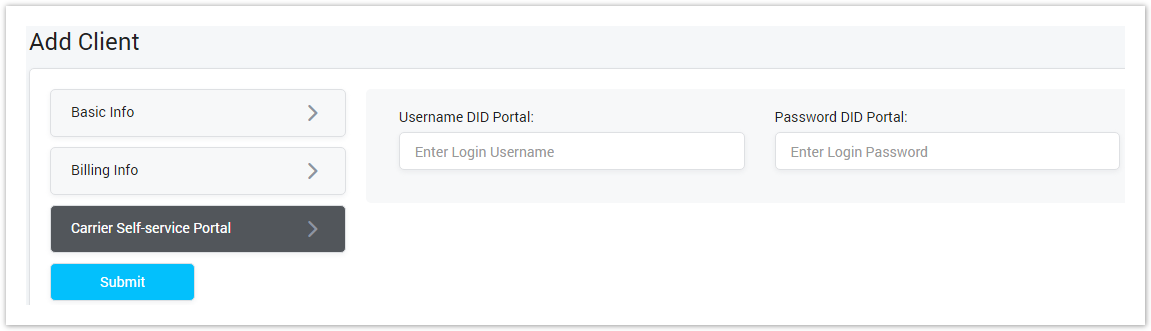
| Field Name | Description |
|---|---|
| Username DID Portal | Username used to login to the web portal. |
| Password DID Portal | Password used to login to the web portal. |
After filling out all fields, click Submit button to save. Click on Back button to go back to Client page.
Delete Selected
This option allows you select some specific Clients. You can select the list of Clients need to delete by checking on the checkbox. Then click on Delete Selected button, all the selected Clients will be deleted.
Related pages
| Content by Label | ||||||||||||||
|---|---|---|---|---|---|---|---|---|---|---|---|---|---|---|
|
Popular Topics
| Popular Labels | ||||
|---|---|---|---|---|
|
Recently Updated Pages
| Recently Updated | ||||||||
|---|---|---|---|---|---|---|---|---|
|